> ## Documentation Index
> Fetch the complete documentation index at: https://docs.diga.io/llms.txt
> Use this file to discover all available pages before exploring further.
# API Keys
> Create and manage API keys to connect to the Diga API and control access permissions.
API keys allow you to connect to the Diga API and use its features from your own applications. You can create multiple keys with different access levels to control what resources each key can use.
Access this section from **Settings > Project > API Keys**.
Only project **administrators** can create, view, and manage API keys. See the [Team](/en/platform/team) page for more information about roles and permissions.
## Overview
The main view shows a table with all API keys in the project. For each key you can see:
* **Name** of the key
* **Key ID**
* **Key** (masked for security)
* **Creation date**
* **Key permissions** (restricted or unrestricted)
Use the search bar at the top to find keys by name. The table includes pagination when there are many keys.
## Create an API Key
In the upper right corner, click **Create API Key**.
Type a descriptive name to identify the key (for example, "CRM\_Query" or "Booking\_App").
Decide whether to restrict the key's permissions:
* **Unrestricted**: The key has full access to all API resources.
* **Restrict key**: Enable the toggle to configure granular permissions per resource.
Unrestricted API keys represent a security risk. For greater safety, consider restricting access to only the necessary resources.
Click **Save**. The key will be generated and a modal will appear with the **complete API Key**.
The key will not be shown again. Copy it and store it in a secure location before closing the modal.
## Restrict permissions
When you enable the **Restrict key** toggle, you can configure the access level for each API resource. Each resource has three permission levels:
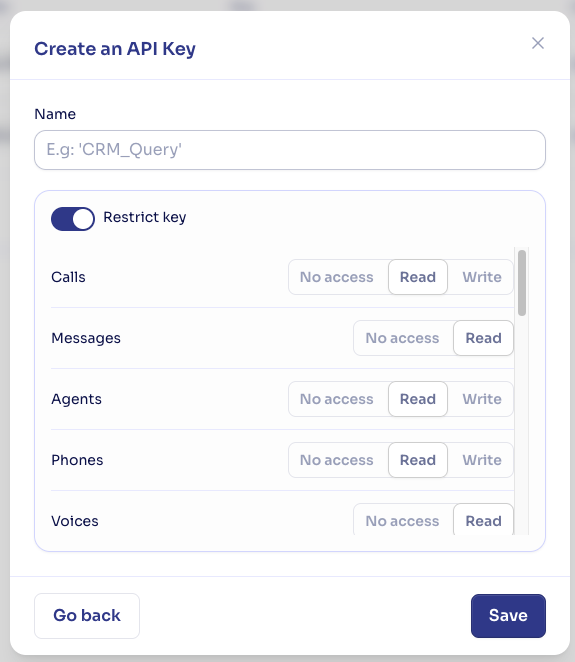 | Level | Description |
| ------------- | ---------------------------------------- |
| **No access** | The key cannot access this resource |
| **Read** | The key can query data but not modify it |
| **Write** | The key can query and modify data |
### Available resources
The resources you can configure permissions for are:
* **Calls** — Phone call management
* **Messages** — Sending and receiving messages
* **Transcriptions** — Access to call transcriptions
* **Recordings** — Access to audio recordings
* **Agents** — Agent creation and configuration
* **Conversational paths** — Conversational path management
* **Knowledge bases** — Knowledge base management
* **Tools** — Call tools
* **Voices** — Voice configuration
* **Integrations** — External integration management
* **Webhooks** — Webhook configuration
* **Contacts** — Contact management
* **Statistics** — Access to analytical data
* **Verifications** — System verifications
* **Phones** — Phone number management
* **Members** — Project team management
* **Billing** — Billing and subscription information
* **API Keys** — Management of other API keys
* **Notifications** — Notification configuration
## Delete an API Key
Deleting an API key is permanent. Any application or service using this key will stop working immediately.
1. In the keys table, click the actions button for the key you want to delete.
2. Select **Delete**.
3. Confirm the action in the confirmation modal by clicking **Delete**.
## Best practices
Avoid using unrestricted keys. Assign each key only the permissions it needs to function. This limits the impact if a key is compromised.
Name keys according to their use (for example, "CRM\_Production", "Mobile\_App\_Staging"). This makes it easy to identify which key corresponds to each application.
Create new keys and delete old ones regularly. This reduces the risk of unauthorized access with keys that may have been leaked.
Use different keys for development, staging, and production. If a development key leaks, your production environment won't be affected.
## FAQ
There's no fixed limit on the number of keys you can create per project.
No. If you need to change a key's permissions, you must delete it and create a new one with the desired configuration.
It's not possible to recover a key once the creation modal is closed. You'll need to create a new key and update the configuration in your applications.
Only users with the **Administrator** role in the project can access the API Keys section.
| Level | Description |
| ------------- | ---------------------------------------- |
| **No access** | The key cannot access this resource |
| **Read** | The key can query data but not modify it |
| **Write** | The key can query and modify data |
### Available resources
The resources you can configure permissions for are:
* **Calls** — Phone call management
* **Messages** — Sending and receiving messages
* **Transcriptions** — Access to call transcriptions
* **Recordings** — Access to audio recordings
* **Agents** — Agent creation and configuration
* **Conversational paths** — Conversational path management
* **Knowledge bases** — Knowledge base management
* **Tools** — Call tools
* **Voices** — Voice configuration
* **Integrations** — External integration management
* **Webhooks** — Webhook configuration
* **Contacts** — Contact management
* **Statistics** — Access to analytical data
* **Verifications** — System verifications
* **Phones** — Phone number management
* **Members** — Project team management
* **Billing** — Billing and subscription information
* **API Keys** — Management of other API keys
* **Notifications** — Notification configuration
## Delete an API Key
Deleting an API key is permanent. Any application or service using this key will stop working immediately.
1. In the keys table, click the actions button for the key you want to delete.
2. Select **Delete**.
3. Confirm the action in the confirmation modal by clicking **Delete**.
## Best practices
Avoid using unrestricted keys. Assign each key only the permissions it needs to function. This limits the impact if a key is compromised.
Name keys according to their use (for example, "CRM\_Production", "Mobile\_App\_Staging"). This makes it easy to identify which key corresponds to each application.
Create new keys and delete old ones regularly. This reduces the risk of unauthorized access with keys that may have been leaked.
Use different keys for development, staging, and production. If a development key leaks, your production environment won't be affected.
## FAQ
There's no fixed limit on the number of keys you can create per project.
No. If you need to change a key's permissions, you must delete it and create a new one with the desired configuration.
It's not possible to recover a key once the creation modal is closed. You'll need to create a new key and update the configuration in your applications.
Only users with the **Administrator** role in the project can access the API Keys section.