> ## Documentation Index
> Fetch the complete documentation index at: https://docs.diga.io/llms.txt
> Use this file to discover all available pages before exploring further.
# Add Your External Integrations
> Connect your agent with external services to expand its functionality
## Introduction
Once you've created your integrations (HTTP or MCP), you need to **assign them to your agents** so they can use the tools during calls. This process allows you to control:
* **Which agents** have access to which integrations
* **Which specific tools** from each integration each agent can use
* **In which version** of the agent the tools are available
This gives you granular control over what actions each agent can perform, following the principle of least privilege.
**Prerequisite**: Before assigning integrations to an agent, you need to have created the integrations. If you haven't done so yet, see:
* [HTTP Integrations](/en/build/integrations/http-integrations)
* [MCP Integrations](/en/build/integrations/mcp-integrations)
## Assign Integration to an Agent
The following describes the steps to assign an existing integration to an agent in single prompt mode. If you want to add integrations to a Conversational Path agent, see the corresponding section on [tool nodes](/en/build/agents/conversational-paths/node-types)
From the dashboard, go to the **Agents** section and select the agent you want to add integrations to.
In the agent configuration that appears in the sidebar, select the **Integrations** tab.
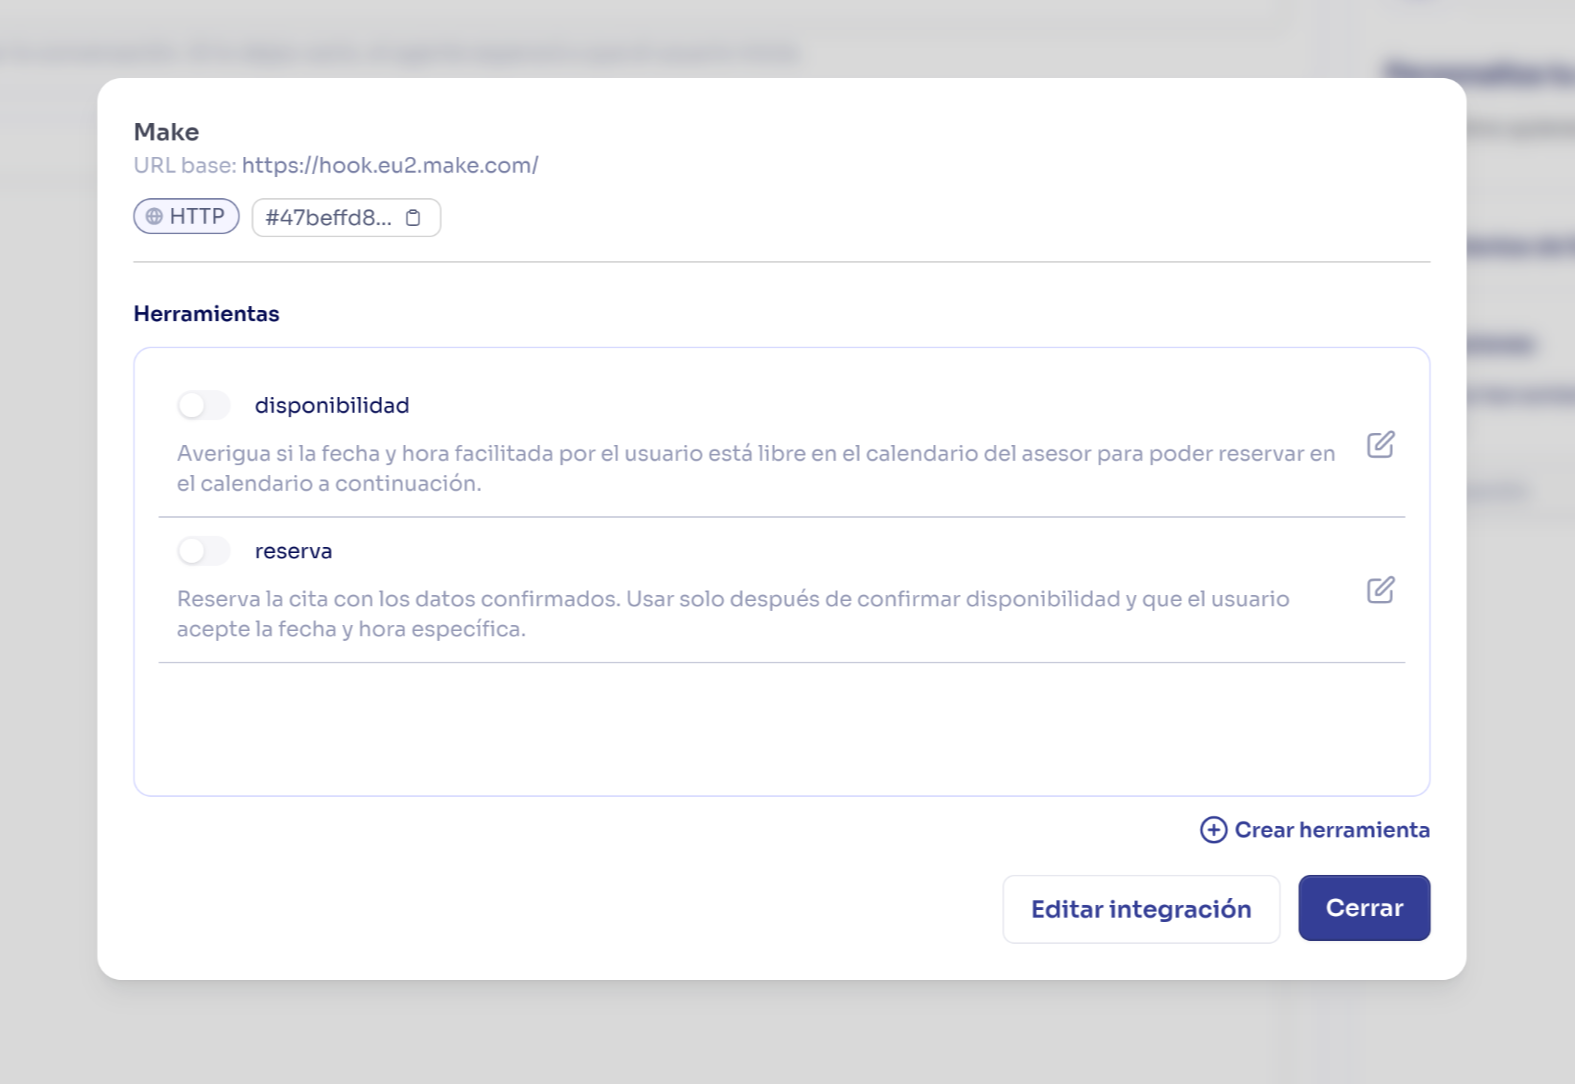
Click **Add Integration** and select the integration you want to assign.
All integrations available in your project will be shown, plus the ability to create a new integration directly from this menu.
After selecting the integration, you'll see a list of all the tools it contains. Here you can select which specific tools you want this agent to be able to use.
Only give access to the tools the agent actually needs. The agent will perform better with fewer tool options.
Changes are saved automatically.
The integration with its tools is now available for this version of the agent.
 ## Tool Filtering by Agent
Different agents have different needs. Filtering allows you to assign the same integration to multiple agents, but with access to different tools.
### Example: Shared CRM Integration
Imagine a "Customer CRM" integration with 10 tools:
**Needs**:
* Search customer
* Check orders
* Create support tickets
* Update contact information
**Doesn't need**:
* Create sales opportunities
* Close sales
* Modify prices
* Delete customers
**Configuration**:
```
Integration: Customer CRM
Allowed tools: 4 of 10
✅ search_customer
✅ check_order
✅ create_ticket
✅ update_contact
```
**Needs**:
* Search customer
* Create opportunities
* Update opportunities
* Check sales pipeline
**Doesn't need**:
* Create support tickets
* Delete customers
* Export data
**Configuration**:
```
Integration: Customer CRM
Allowed tools: 4 of 10
✅ search_customer
✅ create_opportunity
✅ update_opportunity
✅ check_pipeline
```
**Needs**:
* Search customer
* Update complete information
* Check history
* Export reports
**Doesn't need**:
* Delete customers (too dangerous)
* Modify base prices
**Configuration**:
```
Integration: Customer CRM
Allowed tools: 6 of 10
✅ search_customer
✅ update_customer
✅ check_history
✅ export_report
✅ create_note
✅ schedule_meeting
```
### Advantages of Filtering
Reduces the risk of an agent executing dangerous actions by mistake or confusion.
The agent only sees relevant tools, reducing confusion about which one to use.
Facilitates audits by showing exactly what permissions each agent has.
Reuse the same integration for multiple agents with different access levels.
## Multiple Integrations per Agent
An agent can have **multiple integrations** assigned simultaneously. This is useful when it needs to interact with several systems.
### Example: E-commerce Agent
```
Agent: "E-commerce Support"
Assigned integrations:
1. Integration: Order System
Tools:
- check_order
- check_shipping
- cancel_order
2. Integration: Payment Platform
Tools:
- check_transaction
- process_refund (with confirmation)
3. Integration: Customer CRM
Tools:
- search_customer
- update_contact
4. Integration: Inventory System
Tools:
- check_availability
- verify_stock
```
During a call, this agent can:
1. Search for the customer in the CRM
2. Check their order in the Order System
3. Verify payment status in the Payment Platform
4. If necessary, process a refund (with user confirmation)
5. Check availability of alternative products in Inventory
**Organization**: Group related tools into separate integrations. It's easier to manage "Payments Integration" + "CRM Integration" than a single "Mega Integration" with 50 tools.
## Verify Configuration
After assigning integrations, verify that everything is configured correctly:
### Test in Real Call
The best way to validate is to make test calls:
Define scenarios that require using each tool:
* "The user wants to know the status of their order 12345"
* "The user requests a refund"
* "The user wants to update their email"
Call the agent and present each scenario
Confirm that:
* The agent uses the correct tool
* Parameters are sent correctly
* The tool returns expected data
* The agent interprets and communicates the response appropriately
* User confirmation works when enabled
Check the call logs to see:
* Which tools were executed
* What parameters were sent
* What responses were received
* If there were errors
## Next Steps
Learn how to instruct your agents on when and how to use each tool.
Connect any REST API to your agents.
Automatically sync tools from MCP servers.
Manage multiple versions of agents with different configurations.
## Tool Filtering by Agent
Different agents have different needs. Filtering allows you to assign the same integration to multiple agents, but with access to different tools.
### Example: Shared CRM Integration
Imagine a "Customer CRM" integration with 10 tools:
**Needs**:
* Search customer
* Check orders
* Create support tickets
* Update contact information
**Doesn't need**:
* Create sales opportunities
* Close sales
* Modify prices
* Delete customers
**Configuration**:
```
Integration: Customer CRM
Allowed tools: 4 of 10
✅ search_customer
✅ check_order
✅ create_ticket
✅ update_contact
```
**Needs**:
* Search customer
* Create opportunities
* Update opportunities
* Check sales pipeline
**Doesn't need**:
* Create support tickets
* Delete customers
* Export data
**Configuration**:
```
Integration: Customer CRM
Allowed tools: 4 of 10
✅ search_customer
✅ create_opportunity
✅ update_opportunity
✅ check_pipeline
```
**Needs**:
* Search customer
* Update complete information
* Check history
* Export reports
**Doesn't need**:
* Delete customers (too dangerous)
* Modify base prices
**Configuration**:
```
Integration: Customer CRM
Allowed tools: 6 of 10
✅ search_customer
✅ update_customer
✅ check_history
✅ export_report
✅ create_note
✅ schedule_meeting
```
### Advantages of Filtering
Reduces the risk of an agent executing dangerous actions by mistake or confusion.
The agent only sees relevant tools, reducing confusion about which one to use.
Facilitates audits by showing exactly what permissions each agent has.
Reuse the same integration for multiple agents with different access levels.
## Multiple Integrations per Agent
An agent can have **multiple integrations** assigned simultaneously. This is useful when it needs to interact with several systems.
### Example: E-commerce Agent
```
Agent: "E-commerce Support"
Assigned integrations:
1. Integration: Order System
Tools:
- check_order
- check_shipping
- cancel_order
2. Integration: Payment Platform
Tools:
- check_transaction
- process_refund (with confirmation)
3. Integration: Customer CRM
Tools:
- search_customer
- update_contact
4. Integration: Inventory System
Tools:
- check_availability
- verify_stock
```
During a call, this agent can:
1. Search for the customer in the CRM
2. Check their order in the Order System
3. Verify payment status in the Payment Platform
4. If necessary, process a refund (with user confirmation)
5. Check availability of alternative products in Inventory
**Organization**: Group related tools into separate integrations. It's easier to manage "Payments Integration" + "CRM Integration" than a single "Mega Integration" with 50 tools.
## Verify Configuration
After assigning integrations, verify that everything is configured correctly:
### Test in Real Call
The best way to validate is to make test calls:
Define scenarios that require using each tool:
* "The user wants to know the status of their order 12345"
* "The user requests a refund"
* "The user wants to update their email"
Call the agent and present each scenario
Confirm that:
* The agent uses the correct tool
* Parameters are sent correctly
* The tool returns expected data
* The agent interprets and communicates the response appropriately
* User confirmation works when enabled
Check the call logs to see:
* Which tools were executed
* What parameters were sent
* What responses were received
* If there were errors
## Next Steps
Learn how to instruct your agents on when and how to use each tool.
Connect any REST API to your agents.
Automatically sync tools from MCP servers.
Manage multiple versions of agents with different configurations.